vineri, 16 iulie 2021

Hadoop Cluster 3.3.1+ Apache Zookeeper-3.6.3 Installation on CentOS 8 Stream minimal install


Architecture

IP Address

Hostname

Role

192.168.137.3

hadoopmaster

NameNode, ResourceManager

192.168.137.4

hadoopslave1

SecondaryNameNode, DataNode, NodeManager

192.168.137.5

hadoopslave2

DataNode, NodeManager


CentOS setup
install necessary packages for OS

We pick up CentOS minimal ISO, once the system installed, we need several more basic packages:

sudo yum install -y net-tools

sudo yum install -y openssh-server

sudo yum install -y wget

The first line is to install ifconfig, while the second one is to be able to be ssh login by remote peer.


setup hostname for all nodes

hostnamectl set-hostname hadoopmaster

hostnamectl set-hostname hadoopslave1

hostnamectl set-hostname hadoopslave2

re-login to check the effect


setup jdk for all nodes

install jdk from oracle official website

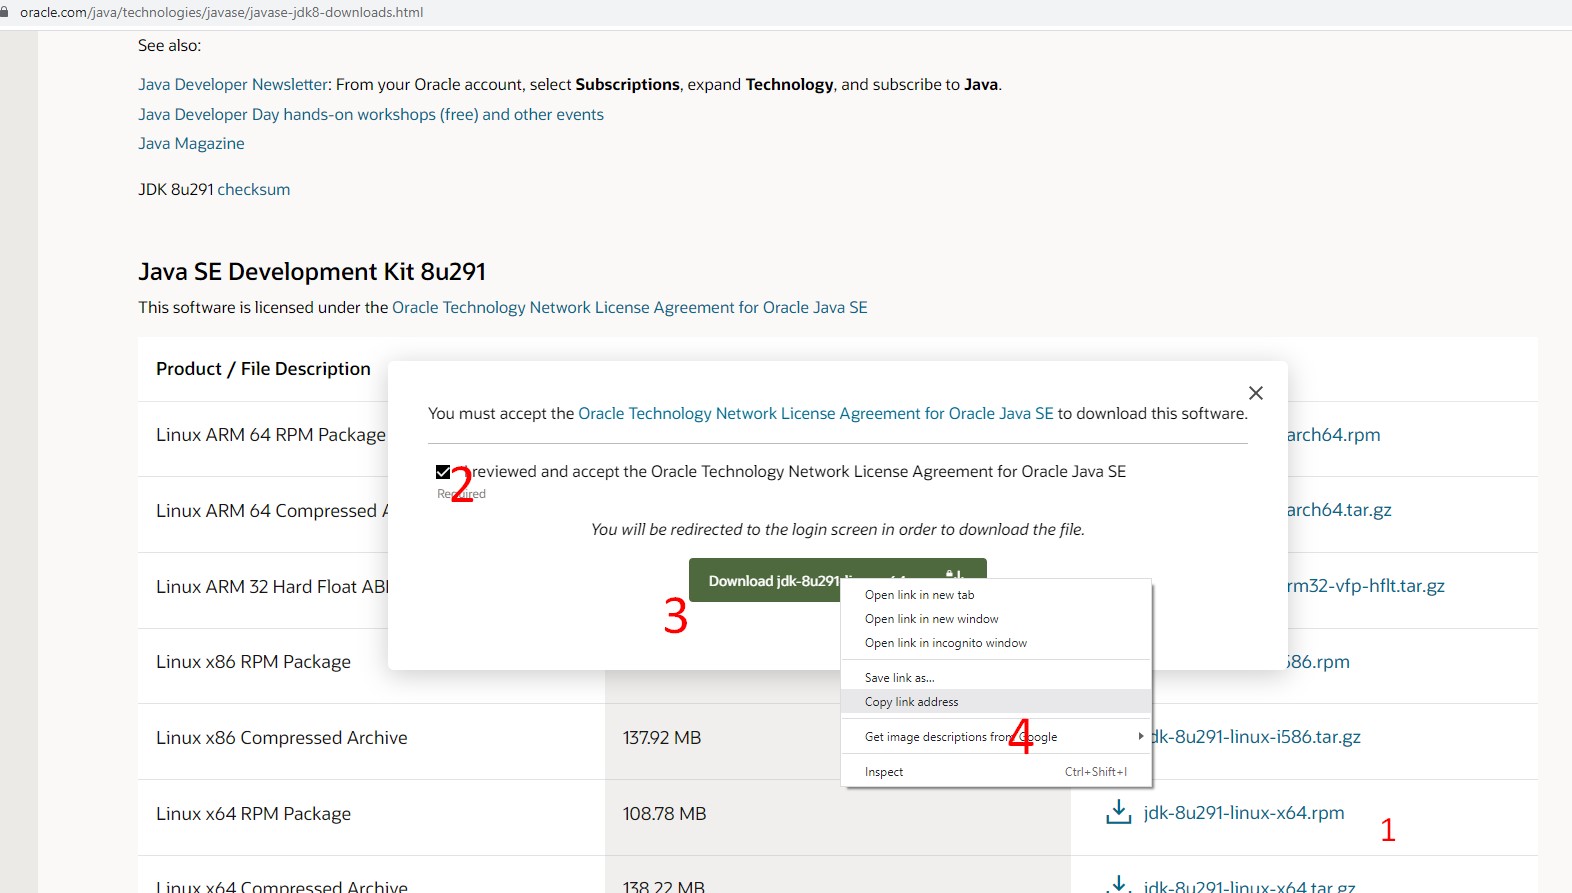
Enter on
https://www.oracle.com/java/technologies/javase/javase-jdk8-downloads.html

Get a session


Copy linked


And make next command to run

cd ~

wget --header "Cookie: oraclelicense=accept-securebackup-cookie" https://download.oracle.com/otn-pub/java/jdk/8u291-b10/d7fc238d0cbf4b0dac67be84580cfb4b/jdk-8u291-linux-x64.rpm

yum localinstall -y jdk-8u291-linux-x64.rpm


add java.sh under /etc/profile.d/


export JAVA_HOME=/usr/java/latest

export JRE_HOME=/usr/java/latest/jre

export CLASSPATH=$JAVA_HOME/lib:.

export PATH=$PATH:$JAVA_HOME/bin


re-login, and you’ll find all environment variables, and java is well installed.


java -version

ls $JAVA_HOME

echo $PATH


if the java version goes wrong, you can


update-alternatives --config java


then choose a correct version.


setup user and user group on all nodes


sudo groupadd hadoop

sudo useradd -d /home/hadoop -g hadoop hadoop

sudo passwd hadoop


modify hosts file for network inter-recognition on all nodes


echo '192.168.137.3 hadoopmaster' >> /etc/hosts

echo '192.168.137.4 hadoopslave1' >> /etc/hosts

echo '192.168.137.5 hadoopslave2' >> /etc/hosts


check the recognition works using ping to hostnames.


setup ssh no password login on all nodes


On master server


su - hadoop

ssh-keygen -t rsa

ssh-copy-id hadoopmaster

ssh-copy-id hadoopslave1

ssh-copy-id hadoopslave2


stop & disable firewall


systemctl stop firewalld.service

systemctl disable firewalld.service


Hadoop Setup


the whole step operations happens on a single node, let’s say, hadoopmaster. In addition, we’ll login as user hadoop to finish all operations.


Download and untar on the file system.


su - hadoop

wget http://mirrors.sonic.net/apache/hadoop/common/stable/hadoop-3.3.1.tar.gz

tar -xvf hadoop-3.3.1.tar.gz

chmod 775 hadoop-3.3.1


Add environment variables for hadoop


append following content into ~/.bashrc after “export PATH”


export HADOOP_HOME=/home/hadoop/hadoop-3.3.1

export HADOOP_INSTALL=$HADOOP_HOME

export HADOOP_MAPRED_HOME=$HADOOP_HOME

export HADOOP_COMMON_HOME=$HADOOP_HOME

export HADOOP_HDFS_HOME=$HADOOP_HOME

export YARN_HOME=$HADOOP_HOME

export HADOOP_COMMON_LIB_NATIVE_DIR=$HADOOP_HOME/lib/native

export PATH=$PATH:$HADOOP_HOME/sbin:$HADOOP_HOME/bin


then make these variables effect:

source ~/.bashrc

Modify configuration files for hadoop


Add slave node hostnames into $HADOOP_HOME/etc/hadoop/slaves file

echo hadoopslave1 > $HADOOP_HOME/etc/hadoop/slaves

echo hadoopslave2 >> $HADOOP_HOME/etc/hadoop/slaves
Add secondary node hostname into $HADOOP_HOME/etc/hadoop/masters file

echo hadoopslave1 > $HADOOP_HOME/etc/hadoop/masters
Modify $HADOOP_HOME/etc/hadoop/core-site.xml as following


<configuration>

<property>

<name>fs.defaultFS</name>

<value>hdfs://hadoopmaster:9000/</value>

<description>namenode settings</description>

</property>

<property>

<name>hadoop.tmp.dir</name>

<value>/home/hadoop/hadoop-3.3.1/tmp/hadoop-${user.name}</value>

<description> temp folder </description>

</property>

<property>

<name>hadoop.proxyuser.hadoop.hosts</name>

<value>*</value>

</property>

<property>

<name>hadoop.proxyuser.hadoop.groups</name>

<value>*</value>

</property>

</configuration>
Modify $HADOOP_HOME/etc/hadoop/hdfs-site.xml as following

<configuration>

<property>

<name>dfs.namenode.http-address</name>

<value>hadoopmaster:50070</value>

<description> fetch NameNode images and edits </description>

</property>

<property>

<name>dfs.namenode.secondary.http-address</name>

<value>hadoopslave1:50090</value>

<description> fetch SecondNameNode fsimage </description>

</property>

<property>

<name>dfs.replication</name>

<value>2</value>

<description> replica count </description>

</property>

<property>

<name>dfs.namenode.name.dir</name>

<value>file:///home/hadoop//hadoop-3.3.1hdfs/name</value>

<description> namenode </description>

</property>

<property>

<name>dfs.datanode.data.dir</name>

<value>file:///home/hadoop/hadoop-3.3.1/hdfs/data</value>

<description> DataNode </description>

</property>

<property>

<name>dfs.namenode.checkpoint.dir</name>

<value>file:///home/hadoop/hadoop-3.3.1/hdfs/namesecondary</value>

<description> check point </description>

</property>

<property>

<name>dfs.webhdfs.enabled</name>

<value>true</value>

</property>

<property>

<name>dfs.stream-buffer-size</name>

<value>131072</value>

<description> buffer </description>

</property>

<property>

<name>dfs.namenode.checkpoint.period</name>

<value>3600</value>

<description> duration </description>

</property>


</configuration>


Modify $HADOOP_HOME/etc/hadoop/mapred-site.xml as following


<configuration>

<property>

<name>mapreduce.framework.name</name>

<value>yarn</value>

</property>

<property>

<name>mapreduce.jobtracker.address</name>

<value>hdfs://trucy:9001</value>

</property>

<property>

<name>mapreduce.jobhistory.address</name>

<value>hadoopmaster:10020</value>

<description>MapReduce JobHistory Server host:port, default port is 10020.</description>

</property>

<property>

<name>mapreduce.jobhistory.webapp.address</name>

<value>hadoopmaster:19888</value>

<description>MapReduce JobHistory Server Web UI host:port, default port is 19888.</description>

</property>


</configuration>


Modify $HADOOP_HOME/etc/hadoop/yarn-site.xml as following

<configuration>


<!-- Site specific YARN configuration properties -->

<property>

<name>yarn.resourcemanager.hostname</name>

<value>hadoopmaster</value>

</property>

<property>

<name>yarn.nodemanager.aux-services</name>

<value>mapreduce_shuffle</value>

</property>

<property>

<name>yarn.nodemanager.aux-services.mapreduce.shuffle.class</name>

<value>org.apache.hadoop.mapred.ShuffleHandler</value>

</property>

<property>

<name>yarn.resourcemanager.address</name>

<value>hadoopmaster:8032</value>

</property>

<property>

<name>yarn.resourcemanager.scheduler.address</name>

<value>hadoopmaster:8030</value>

</property>

<property>

<name>yarn.resourcemanager.resource-tracker.address</name>

<value>hadoopmaster:8031</value>

</property>

<property>

<name>yarn.resourcemanager.admin.address</name>

<value>hadoopmaster:8033</value>

</property>

<property>

<name>yarn.resourcemanager.webapp.address</name>

<value>hadoopmaster:8088</value>

</property>


</configuration>


Create necessary folders


mkdir -p $HADOOP_HOME/tmp

mkdir -p $HADOOP_HOME/hdfs/name

mkdir -p $HADOOP_HOME/hdfs/data


Copy hadoop folders and environment settings to slaves


scp ~/.bashrc hadoopslave1:~/

scp ~/.bashrc hadoopslave2:~/


scp -r ~/hadoop-3.3.1 hadoopslave1:~/

scp -r ~/hadoop-3.3.1 hadoopslave2:~/


Modify on all nodes $HADOOP_HOME/etc/hadoop/workers as following

vim $HADOOP_HOME/etc/hadoop/workers

Modify lines with value ( one bye line )

hadoopslave1

hadoopslave2

ESC+:x


Launch hadoop cluster service
Format namenode for the first time launch

hdfs namenode -format
Launch dfs distributed file system

start-dfs.sh
Launch yarn distributed computing system

start-yarn.sh
Shutdown Hadoop Cluster

stop-yarn.sh

stop-dfs.sh


Verify the hadoop cluster is up and healthy


Verify by jps processus

Check jps on each node, and view results.


Verify on Web interface


192.168.137.3:50070 to view hdfs storage status.


192.168.137.3:8088 to view yarn computing system resources and application status.


Zookeeper 3.6.3 Cluster Setup for Hadoop


P.S. Please login as hadoop to build this cluster.


Download and untar


wget http://apache.mirrors.pair.com/zookeeper/stable/apache-zookeeper-3.6.3-bin.tar.gz

tar -zxvf apache-zookeeper-3.6.3-bin.tar.gz


Configuration files


Append following content in ~/.bashrc

export ZOOKEEPER_HOME=/home/hadoop/apache-zookeeper-3.6.3-bin

export PATH=$PATH:$ZOOKEEPER_HOME/bin


then make these variables effect:

source ~/.bashrc


Create zoo.cfg file

cp $ZOOKEEPER_HOME/conf/zoo_sample.cfg $ZOOKEEPER_HOME/conf/zoo.cfg


Append the following to zoo.cfg

dataDir=/home/hadoop/apache-zookeeper-3.6.3-bin/data

dataLogDir=/home/hadoop/apache-zookeeper-3.6.3-bin/logs

server.1=hadoopmaster:2888:3888

server.2=hadoopslave1:2888:3888

server.3=hadoopslave2:2888:3888
Create necessary folders


mkdir -p $ZOOKEEPER_HOME/logs

mkdir -p $ZOOKEEPER_HOME/data


Copy the zookeeper folder and configuration to all nodes


cd ~

scp -r .bashrc hadoopslave1:~/

scp -r .bashrc hadoopslave2:~/


scp -r apache-zookeeper-3.6.3-bin hadoopslave1:~/

scp -r apache-zookeeper-3.6.3-bin hadoopslave2:~/


Specify the server id according to the zoo.cfg configuration, around all nodes


ssh hadoopmaster echo 1 > $ZOOKEEPER_HOME/data/myid

ssh hadoopslave1 echo 2 > $ZOOKEEPER_HOME/data/myid

ssh hadoopslave2 echo 3 > $ZOOKEEPER_HOME/data/myid

P.S. 1 for hadoopmaster, 2 for hadoopslave1, 3 for hadoopslave2


Launch and Shutdown Zookeeper Cluster Service


zkServer.sh start

zkServer.sh stop


Verify the Zookeeper cluster is up and healthy


use jps to check through all nodes


zkCli.sh to verify all nodes are well being synchronized. ( After your start zk on all nodes )


Done.

Centos 8 Stream - haproxy balancer - percona 5.7 cluster

 CentOS Stream release 8 - minmal install

192.168.137.9 db1
192.168.137.10 db2
192.168.137.11 db3
192.168.137.12 clustercontroldb

dnf groupinfo "Development Tools"
dnf group install "Development Tools"
dnf update
dnf install mlocate
dnf install vim
dnf install net-tools
dnf install wget
vim /etc/sysconfig/selinux
firewall-cmd --zone=public --add-service=mysql --permanent
firewall-cmd --zone=public --add-port=3306/tcp       --permanent
firewall-cmd --zone=public --add-port=4567/tcp       --permanent
firewall-cmd --zone=public --add-port=4568/tcp       --permanent
firewall-cmd --zone=public --add-port=4444/tcp       --permanent
firewall-cmd --zone=public --add-port=4567/udp       --permanent
firewall-cmd --zone=public --add-port=9200/tcp --permanent
firewall-cmd --reload
yum install epel-release
yum install socat
yum remove mariadb-libs
yum install https://repo.percona.com/yum/percona-release-latest.noarch.rpm
yum install rsync nc
percona-release enable-only pxc-57
percona-release enable tools release
yum module disable mysql
yum install Percona-XtraDB-Cluster-full-57
systemctl  start mysql
grep 'temporary password' /var/log/mysqld.log
mysql_secure_installation
mysql -u root -p
mysql> create user sstuser@'%' identified by 'parolagrea';
mysql> grant all on *.* to sstuser@'%';
mysql> flush privileges;
mysql> quit

vim /etc/percona-xtradb-cluster.conf.d/wsrep.cnf
db1
wsrep_cluster_address = gcomm://
wsrep_provider = /usr/lib64/galera3/libgalera_smm.so

wsrep_slave_threads = 8
wsrep_cluster_name = pxc-cluster
wsrep_node_name = pxc-cluster-node-db1
wsrep_node_address = db1
wsrep_sst_method = xtrabackup-v2
wsrep_sst_auth = sstuser:parolagrea

db2
wsrep_cluster_address = gcomm://db1,db2,db3
wsrep_provider = /usr/lib64/galera3/libgalera_smm.so

wsrep_slave_threads = 8
wsrep_cluster_name = pxc-cluster
wsrep_node_name = pxc-cluster-node-db2
wsrep_node_address = db2
wsrep_sst_method = xtrabackup-v2
wsrep_sst_auth = sstuser:parolagrea

db3
wsrep_cluster_address = gcomm://db1,db2,db3
wsrep_provider = /usr/lib64/galera3/libgalera_smm.so

wsrep_slave_threads = 8
wsrep_cluster_name = pxc-cluster
wsrep_node_name = pxc-cluster-node-db3
wsrep_node_address = db3
wsrep_sst_method = xtrabackup-v2
wsrep_sst_auth = sstuser:parolagrea

on db2,db3
vim /etc/percona-xtradb-cluster.conf.d/mysqld.cnf
change server-id=1 in server-id=2 and server-id=3

db1
systemctl start mysql@bootstrap

db2 - after db1 finish
systemctl start mysql

db3 - after db3 finish
systemctl start mysql

db1
mysql -u root -p

mysql> SHOW STATUS LIKE 'wsrep_local_state_comment';
mysql> show global status like 'wsrep_cluster_size';

In cluster of 3 at least 2 need to be up.
if systemctl stop mysql@bootstrap was gived on db1, and somehow gone off.
db2 and db3 will be up.
When db1 come alive, need to have setup wsrep_cluster_address = gcomm://db1,db2,db3 and use
systemctl start mysql

if u decide to make it again db1 as bootstrap proccess owner, after previous case, u need shutdown all the others nodes, systemctl stop mysql and then the last one systemctl stop mysql on db1.
After all mysql stoped, u can use again systemctl stop mysql@bootstrap on db1 and continue with usual starting nodes schema.

HAproxy settings

on all cluster nodes  ( might allready exist after full install percona cluster, u can overwrite it)

if not ...

on all nodes.

wget https://raw.githubusercontent.com/olafz/percona-clustercheck/master/clustercheck
chmod +x clustercheck
mv /usr/bin/clustercheck /usr/bin/clustercheck.old
mv clustercheck /usr/bin/
vim /usr/bin/clustercheck

#MYSQL_USERNAME="${MYSQL_USERNAME:=-clustercheckuser}"
#MYSQL_PASSWORD="${MYSQL_PASSWORD-clustercheckparola!}"
MYSQL_USERNAME="clustercheckuser"
MYSQL_PASSWORD="clustercheckparola!"

yum install xinetd

check if /etc/xinetd.d/mysqlchk does exist.

if not

create it

vim /etc/xinetd.d/mysqlchk

# default: on
# description: mysqlchk
service mysqlchk
{
# this is a config for xinetd, place it in /etc/xinetd.d/
  disable = no
  flags = REUSE
  socket_type = stream
  type = UNLISTED
  port = 9200
  wait = no
  user = nobody
  server = /usr/bin/clustercheck
  log_on_failure += USERID
  only_from = 0.0.0.0/0
  # recommended to put the IPs that need
  # to connect exclusively (security purposes)
  per_source = UNLIMITED
}

chmod

service xinetd restart

on one node
mysql -u root -p

mysql> GRANT PROCESS ON *.* TO 'clustercheckuser'@'localhost' IDENTIFIED BY 'clustercheckparola!';

exit;

vim /etc/services

find line who contain 9200, comment and ad new line
mysqlchk 9200/tcp # mysqlchk

On HAproxy server

systemctl stop firewalld
setenforce 0
dnf install gcc gcc-c++ make pcre-devel bzip2-devel
dnf install haproxy
mv /etc/haproxy/haproxy.cfg /etc/haproxy/haproxy.cfg.bk

vim /etc/haproxy/haproxy.cfg

global
log 127.0.0.1 local0
log 127.0.0.1 local1 notice
maxconn 4096
chroot /usr/share/haproxy
user haproxy
group haproxy
daemon

defaults
log global
mode http
option tcplog
option dontlognull
retries 3
option redispatch
maxconn 2000
contimeout 5000
clitimeout 50000
srvtimeout 50000

frontend pxc-front
bind *:3307
mode tcp
default_backend pxc-back

frontend stats-front
bind *:80
mode http
default_backend stats-back

frontend pxc-onenode-front
bind *:3306
mode tcp
default_backend pxc-onenode-back

backend pxc-back
mode tcp
balance leastconn
option httpchk
server db1 192.168.137.9:3306 check port 9200 inter 12000 rise 3 fall 3
server db2 192.168.137.10:3306 check port 9200 inter 12000 rise 3 fall 3
server db3 192.168.137.11:3306 check port 9200 inter 12000 rise 3 fall 3

backend stats-back
mode http
balance roundrobin
stats uri /haproxy/stats
stats auth pxcstats:secret

backend pxc-onenode-back
mode tcp
balance leastconn
option httpchk
server db1 192.168.137.9:3306 check port 9200 inter 12000 rise 3 fall 3
server db2 192.168.137.10:3306 check port 9200 inter 12000 rise 3 fall 3 backup
server db3 192.168.137.11:3306 check port 9200 inter 12000 rise 3 fall 3 backup


systemctl start firewalld
firewall-cmd --permanent --add-port=9000/tcp
firewall-cmd --permanent --add-port=3030/tcp
firewall-cmd --permanent --add-port=80/tcp

firewall-cmd --reload


yum install https://repo.percona.com/yum/percona-release-latest.noarch.rpm
yum install rsync nc
percona-release enable-only pxc-57
percona-release enable tools release
yum module disable mysql
yum install Percona-XtraDB-Cluster-client-57

vim /etc/services

find line who contain 9200, comment and ad new line
mysqlchk 9200/tcp # mysqlchk


dnf install sysbench

http://clustercontroldb/haproxy/stats
user:pxcstats
pass:secret

on db1

mysql> create database sbtest;
Query OK, 1 row affected (0.01 sec)

mysql> grant all on sbtest.* to 'sbtest'@'%' identified by 'sbpass';
Query OK, 0 rows affected (0.00 sec)

mysql> flush privileges;
Query OK, 0 rows affected (0.00 sec)

on haproxy TEST

sysbench --db-driver=mysql --mysql-host=127.0.0.1 --mysql-port=3307 --mysql-user=sbtest --mysql-password=sbpass --mysql-db=sbtest --table_size=10000 --tables=2 --threads=1 --events=0 --time=60 --rand-type=uniform /usr/share/sysbench/oltp_read_only.lua prepare

sysbench --db-driver=mysql --mysql-host=127.0.0.1 --mysql-port=3307 --mysql-user=sbtest --mysql-password=sbpass --mysql-db=sbtest --range_size=100 --table_size=10000 --tables=2 --threads=1 --events=0 --time=60 --rand-type=uniform /usr/share/sysbench/oltp_read_only.lua run

luni, 3 decembrie 2018

IP ROTATION VIA IPTABLES

Our scenario with 5 public ips.

Create interface aliaces for your main IP

( How to https://www.cyberciti.biz/faq/linux-creating-or-adding-new-network-alias-to-a-network-card-nic/)

# ifup eth0:1
# ifup eth0:2
# ifup eth0:3
# ifup eth0:4

Be sure that your iptables support for statistic match module.

# iptables -m statistic -h

statistic match options:
--mode mode Match mode (random, nth)
random mode:
--probability p Probability
nth mode:
--every n Match every nth packet
--packet p Initial counter value (0 <= p <= n-1, default 0)

Iptables rule for rotating source IP addresses.

# iptables -t nat -I POSTROUTING -m state --state NEW -p tcp --dport 25 -o eth0 -m statistic --mode nth --every 5 -j SNAT --to-source 213.XXX.XX.2
# iptables -t nat -I POSTROUTING -m state --state NEW -p tcp --dport 25 -o eth0 -m statistic --mode nth --every 5 -j SNAT --to-source 213.XXX.XX.3
# iptables -t nat -I POSTROUTING -m state --state NEW -p tcp --dport 25 -o eth0 -m statistic --mode nth --every 5 -j SNAT --to-source 213.XXX.XX.4
# iptables -t nat -I POSTROUTING -m state --state NEW -p tcp --dport 25 -o eth0 -m statistic --mode nth --every 5 -j SNAT --to-source 213.XXX.XX.5
# iptables -t nat -I POSTROUTING -m state --state NEW -p tcp --dport 25 -o eth0 -m statistic --mode nth --every 5 -j SNAT --to-source 213.XXX.XX.6

sâmbătă, 18 august 2018

PowerShell script in schedule task cannot start a second script

In my current firstscript.ps1 i`m checking if i got allready a job started and running, if not will will give a job start for a second script.
This firstscript.ps1 i got in Schedule Task
$Env:SCRIPT_HOME - is a User Enviroment for a path

contenet example for firstscript.ps1

$maxConcurrentJobs = 1
if ((Get-Job -State 'Running').Count -eq $maxConcurrentJobs) {
 $joburicurente = (Get-Job -State 'Running').Count
 Write-Host -ForegroundColor RED  “Mai sunt $joburicurente"
} Else {
 $joburicurente = (Get-Job -State 'Running').Count

 Write-Host -ForegroundColor GREEN “ Putem rula job-ul. Mai sunt $joburicurente"
 #start-job -filepath $Env:SCRIPT_HOME \monitor\secondscript.ps1


$job_result = start-job -filepath $Env:SCRIPT_HOME \monitor\secondscript.ps1

$job_id = $job_result.id
while ($job_result.state -match "Running"){
Start-Sleep -seconds 5
$job_result = get-job $job_id
}

}

Tested with PowerShell 4

luni, 23 aprilie 2018

Avoid errors when install SharePoint 2016

Error in process of Prerequisite installation

Most of errors apears when Prerequisite is not done well or when you manual install some package which require preconfiguration made by prerequisite software (prerequisiteinstaller.exe) .

So ... DONT manual install Server AppFabric, Cumulative Update 7 for AppFrabic 1.1 and WCF Data Services,use prerequisiteinstaller.exe to do it.

1. First step when u do offline installing. Download packages or use this powershell script https://www.mondor.ro/stuff/Download-SP2016-prerechizite.ps1.

Links to download:

Microsoft SQL Server 2012 SP1 Native Client
Microsoft ODBC Driver 11 for SQL Server
Microsoft Sync Framework Runtime v1.0 SP1 (x64)
Microsoft Identity Extensions
Windows Server AppFabric 1.1
Cumulative Update 7 for Microsoft AppFabric 1.1 for Windows Server
Microsoft Information Protection and Control Client
Microsoft WCF Data Services 5.6
Visual C++ Redistributable Package for Visual Studio 2015
Another visual C++ Redistributable Package for Visual Studio 2013/2012
.NET framework 4.6


2. DONT manual install Server AppFabric, Cumulative Update 7 for AppFrabic 1.1 and WCF Data Services, use prerequisiteinstaller.exe like:

prerequisiteinstaller.exe /AppFabric:C:\path-to-downloaded-files\WindowsServerAppFabricSetup_x64.exe

prerequisiteinstaller.exe /WCFDataServices:C:\path-to-downloaded-files\WcfDataServices.exe /quiet

Than install Patch for AppFabric 1.1 

3. Reboot
4. Continue Normal install Sharepoint 2016

Good Luck!

luni, 2 aprilie 2018

Add External SMTP Server for Nagios Notifications

On Centos 6/7

yum install mailx

locate commands.cfg

/usr/local/nagios/etc/objects/commands.cfg

Edit

vi /usr/local/nagios/etc/objects/commands.cfg

and change notify-host-by-email and notify-service-by-email into this:

# 'notify-host-by-email' command definition
define command{
        command_name    notify-host-by-email
        command_line    /usr/bin/printf "%b" "***** Nagios *****\n\nNotification Type: $NOTIFICATIONTYPE$\nHost: $HOSTNAME$\nState: $HOSTSTATE$\nAddress: $HOSTADDRESS$\nInfo: $HOSTOUTPUT$\n\nDate/Time: $LONGDATETIME$\n" | /usr/bin/mailx -s "** $NOTIFICATIONTYPE$ Host Alert: $HOSTNAME$ is $HOSTSTATE$ **" -S smtp-auth=login -S smtp="server.mondor.ro:25" -S from="nagios@mondor.ro" -S smtp-auth-user="nagios@mondor.ro" -S smtp-auth-password="password" $CONTACTEMAIL$
        }

# 'notify-service-by-email' command definition
define command{
        command_name    notify-service-by-email
        command_line    /usr/bin/printf "%b" "***** Nagios *****\n\nNotification Type: $NOTIFICATIONTYPE$\n\nService: $SERVICEDESC$\nHost: $HOSTALIAS$\nAddress: $HOSTADDRESS$\nState: $SERVICESTATE$\n\nDate/Time: $LONGDATETIME$\n\nAdditional Info:\n\n$SERVICEOUTPUT$\n" | /usr/bin/mailx -s "** $NOTIFICATIONTYPE$ Service Alert: $HOSTALIAS$/$SERVICEDESC$ is $SERVICESTATE$ **" -S smtp-auth=login -S smtp="server.mondor.ro:25" -S from="nagios@mondor.ro" -S smtp-auth-user="nagios@mondor.ro" -S smtp-auth-password="password" $CONTACTEMAIL$
        }

vineri, 24 noiembrie 2017

Perfect Installer Secured OpenVPN 2.3.3 - 2.4.4 - from source

Hi there, inspired from source - https://github.com/Angristan/OpenVPN-install
Tested on Centos 7.x and working fine here a script, put the name openvpn-installer.sh

Before runing this script save your firewall rules and reapply after running this and append new rules need to openvpn.

openvpn-installer.sh

#!/bin/bash
# v3
# OPENVPN (also suported clients <= 2.3.3)
# PORT:  1149 tcp/udp
# CIPHER: AES-128-CBC
# CERTIFICATE: RSA
# RSA_SIZE: 4096
# CERT_HASH: sha384
# DH_TYPE: DH
# DH_SIZE: 4096
# CC_ENC: TLS-ECDHE-RSA-WITH-AES-256-GCM-SHA384
# TLS_SIG: tls-auth
# HMAC_AUTH: SHA384
# COMPRESSION: lz0

#Detect root user
if [[ "$EUID" -ne 0 ]]; then
echo "Sorry, you need to run this as root"
exit 1
fi

#Detect TUN
if [[ ! -e /dev/net/tun ]]; then
echo "TUN is not available"
exit 2
fi

#Detect CENTOS
if [[ -e /etc/centos-release || -e /etc/redhat-release ]]; then
        OS=centos
        IPTABLES='/etc/sysconfig/iptables'
        SYSCTL='/etc/sysctl.conf'
else
        echo "Looks like you aren't running this installer on CentOS system"
        exit 4
fi

# Detect Server IP.
IP=$(ip addr | grep 'inet' | grep -v inet6 | grep -vE '127\.[0-9]{1,3}\.[0-9]{1,3}\.[0-9]{1,3}' | grep -o -E '[0-9]{1,3}\.[0-9]{1,3}\.[0-9]{1,3}\.[0-9]{1,3}' | head -1)
if [[ "$IP" = "" ]]; then
        IP=$(wget -qO- ipv4.icanhazip.com)
fi
# Detect Network Interface
NIC=$(ip -4 route ls | grep default | grep -Po '(?<=dev )(\S+)' | head -1)

#echo $IP
#echo $NIC

if [[ -e /etc/openvpn/server3.conf ]]; then
while :
do
clear
echo ""
echo "Looks like OpenVPN is already installed"
echo ""
echo "What do you want to do?"
echo "   1) Exit"
read -p "Select an option [1]: " option
case $option in
1) exit;;
esac
done
else
clear
echo "Welcome to the secure OpenVPN installer"
echo ""
# OpenVPN setup
echo ""
echo "Port for OpenVPN"
PORT="1194"
#Default UDP 1194
#echo $PORT
echo ""
echo "What protocol for OpenVPN?"
echo "   1) UDP (recommended)"
PROTOCOL="1"
#echo $PROTOCOL
echo ""
echo "DNS to use with the VPN?"
echo "   1) Google (Anycast: worldwide)"
DNS="1"
#echo $DNS
echo ""
echo "Choose which compression algorithm you want to use:"
echo "   1) LZ0 (use for OpenVPN 2.3 compatibility)"
COMPRESSION="lzo"
#echo $COMPRESSION
echo ""
echo "The encryption in OpenVPN."
echo "Only use AES-CBC for OpenVPN 2.3 compatibilty"
echo "   1) AES-128-CBC"
CIPHER="cipher AES-128-CBC"
#echo $CIPHER
echo ""
echo "Kind of certificate to use"
echo "RSA for OpenVPN 2.3 compatibilty"
echo "   1) RSA"
CERT_TYPE="1"
#echo $CERT_TYPE
echo ""
echo "Choose which RSA key size you want to use:"
echo "   1) 4096 bits"
RSA_SIZE="4096"
#echo $RSA_SIZE
echo ""
echo "Choose which hash algorithm you want to use for the certificate:"
echo "   1) SHA-384 (recommended)"
CERT_HASH="sha384"
#echo $CERT_HASH
echo ""
echo "Choose what kind of Diffie-Hellman key you want to use."
echo "Use DH for OpenVPN 2.3 compatibilty"
echo "   1) DH"
DH_TYPE="1"
#echo $DH_TYPE
echo""
echo "Choose which DH key size you want to use"
echo "   1) 4096 bits"
DH_SIZE="4096"
#echo $DH_SIZE
echo ""
echo "Choose which cipher you want to use for the control channel:"
    echo "   1) ECDHE-RSA-AES-256-GCM-SHA384 (recommended)"
CC_ENC="TLS-ECDHE-RSA-WITH-AES-256-GCM-SHA384"
#echo $CC_ENC
echo ""
echo "Do you want to use tls-crypt or tls-auth?"
echo "They both encrypt and authenticate all control channel packets with a key."
echo "tls-crypt is more advanced and secure than tls-auth, but it's an OpenVPN 2.4 feature."
echo "   1) tls-auth (use only for OpenVPN 2.3 client compatibility)"
TLS_SIG="1"
#echo $TLS_SIG
echo""
echo "Choose which message digest algorithm you want to use for the data channel packets"
echo "and the tls-auth/tls-crypt control channel packets:"
echo "   2) SHA-384 (recommended)"
HMAC_AUTH="SHA384"
#echo $HMAC_AUTH
echo ""
echo "Finally, 1 client certificate and configuration will be add by default: firstuser"
CLIENT="firstuser"
#echo $CLIENT
echo ""
echo "Okay, that was all I needed. We are ready to setup your OpenVPN server now"
read -n1 -r -p "Press any key to continue..."

if [[ "$OS" = 'centos' ]]; then
yum install epel-release -y
        yum --enablerepo=epel -y install openvpn
yum --enablerepo=epel -y install htop
        yum install iptables iptables-services openssl wget ca-certificates curl mlocate net-tools policycoreutils-python redhat-lsb-core -y
# Install iptables service
if [[ ! -e /etc/systemd/system/iptables.service ]]; then
    mkdir /etc/iptables
iptables-save > /etc/sysconfig/iptables
echo "#!/bin/sh
iptables -F
iptables -X
iptables -t nat -F
iptables -t nat -X
iptables -t mangle -F
iptables -t mangle -X
iptables -P INPUT ACCEPT
iptables -P FORWARD ACCEPT
iptables -P OUTPUT ACCEPT" > /etc/iptables/flush-iptables.sh
chmod +x /etc/iptables/flush-iptables.sh
echo "[Unit]
Description=Packet Filtering Framework
DefaultDependencies=no
Before=network-pre.target
Wants=network-pre.target
[Service]
Type=oneshot
ExecStart=/sbin/iptables-restore /etc/sysconfig/iptables
ExecReload=/sbin/iptables-restore /etc/sysconfig/iptables
ExecStop=/etc/iptables/flush-iptables.sh
RemainAfterExit=yes
[Install]
WantedBy=multi-user.target" > /etc/systemd/system/iptables.service
systemctl daemon-reload
systemctl enable iptables.service
# Disable firewalld to allow iptables to start upon reboot
systemctl disable firewalld
fi

fi

#To remember we use tls-auth when generating a new client conf
echo $TLS_SIG > /etc/openvpn/TLS_SIG

# Find out if the machine uses nogroup or nobody for the permissionless group
if grep -qs "^nogroup:" /etc/group; then
NOGROUP=nogroup
else
NOGROUP=nobody
fi

# An old version of easy-rsa was available by default in some openvpn packages
if [[ -d /etc/openvpn/easy-rsa/ ]]; then
rm -rf /etc/openvpn/easy-rsa/
fi
# Get easy-rsa
cd ~/
wget https://github.com/OpenVPN/easy-rsa/releases/download/v3.0.3/EasyRSA-3.0.3.tgz
    tar -xzvf EasyRSA-3.0.3.tgz
    mv /root/EasyRSA-3.0.3 /root/easy-rsa
    mv /root/easy-rsa /etc/openvpn/easy-rsa
chown -R root:root /etc/openvpn/easy-rsa/
rm -rf EasyRSA-3.0.3.tgz
    rm -rf easy-rsa
cd /etc/openvpn/easy-rsa/

if [[ $CERT_TYPE == "1" ]]; then
echo "set_var EASYRSA_KEY_SIZE $RSA_SIZE" > vars
fi
echo 'set_var EASYRSA_DIGEST "'$CERT_HASH'"' >> vars
# Create the PKI, set up the CA, the DH params and the server + client certificates
/etc/openvpn/easy-rsa/easyrsa init-pki
/etc/openvpn/easy-rsa/easyrsa --batch build-ca nopass
openssl dhparam -out dhv3.pem $DH_SIZE
/etc/openvpn/easy-rsa/easyrsa build-server-full server nopass
EASYRSA_CRL_DAYS=3650 /etc/openvpn/easy-rsa/easyrsa gen-crl
if [[ $TLS_SIG == "1" ]]; then
openvpn --genkey --secret /etc/openvpn/tls-auth.key
fi
# Move all the generated files
cp /etc/openvpn/easy-rsa/pki/ca.crt /etc/openvpn/easy-rsa/pki/private/ca.key /etc/openvpn/easy-rsa/pki/issued/server.crt /etc/openvpn/easy-rsa/pki/private/server.key /etc/openvpn/easy-rsa/pki/crl.pem /etc/openvpn
if [[ $DH_TYPE == "1" ]]; then
    cp /etc/openvpn/easy-rsa/dhv3.pem /etc/openvpn
fi
# Make cert revocation list readable for non-root
chmod 644 /etc/openvpn/crl.pem

# Generate server3.conf
echo "port $PORT" > /etc/openvpn/server3.conf
if [[ "$PROTOCOL" = '1' ]]; then
echo "proto udp" >> /etc/openvpn/server3.conf
fi
echo "dev tun
user nobody
group $NOGROUP
persist-key
persist-tun
keepalive 10 120
topology subnet
server 10.8.0.0 255.255.255.0
ifconfig-pool-persist ipp.txt" >> /etc/openvpn/server3.conf
# DNS resolvers
#Google
echo 'push "dhcp-option DNS 8.8.8.8"' >> /etc/openvpn/server3.conf
echo 'push "dhcp-option DNS 8.8.4.4"' >> /etc/openvpn/server3.conf
echo 'push "redirect-gateway def1 bypass-dhcp" '>> /etc/openvpn/server3.conf
echo "crl-verify crl.pem
ca ca.crt
cert server.crt
key server.key" >> /etc/openvpn/server3.conf
if [[ $TLS_SIG == "1" ]]; then
echo "tls-auth tls-auth.key 0" >> /etc/openvpn/server3.conf
fi
if [[ $DH_TYPE == "1" ]]; then
echo "dh dhv3.pem" >> /etc/openvpn/server3.conf
fi
echo "auth $HMAC_AUTH
$CIPHER
ncp-disable
tls-server
tls-version-min 1.2
tls-cipher $CC_ENC" >> /etc/openvpn/server3.conf

if [[  $COMPRESSION == "lzo"  ]]; then
echo "compress $COMPRESSION" >> /etc/openvpn/server3.conf
fi

echo "status openvpn3.log
verb 3" >> /etc/openvpn/server3.conf

# Enable net.ipv4.ip_forward for the system
sed -i '/\<net.ipv4.ip_forward\>/c\net.ipv4.ip_forward=1' $SYSCTL
if ! grep -q "\<net.ipv4.ip_forward\>" $SYSCTL; then
echo 'net.ipv4.ip_forward=1' >> $SYSCTL
fi
# Avoid an unneeded reboot
echo 1 > /proc/sys/net/ipv4/ip_forward
# Set NAT for the VPN subnet
iptables -I INPUT -p udp --dport $PORT -j ACCEPT
iptables -t nat -A POSTROUTING -o $NIC -s 10.8.0.0/24 -j MASQUERADE
iptables -I FORWARD -m state --state RELATED,ESTABLISHED -j ACCEPT
# Save persitent iptables rules
iptables-save > $IPTABLES

if iptables -L -n | grep -qE 'REJECT|DROP'; then
# If iptables has at least one REJECT rule, we asume this is needed.
if [[ "$PROTOCOL" = '1' ]]; then
iptables -I INPUT -p udp --dport $PORT -j ACCEPT
fi
iptables -I FORWARD -s 10.8.0.0/24 -j ACCEPT
iptables -I FORWARD -m state --state RELATED,ESTABLISHED -j ACCEPT
if [[ "$PROTOCOL" = '1' ]]; then
sed -i "1 a\iptables -I INPUT -p udp --dport $PORT -j ACCEPT" $RCLOCAL
fi
sed -i "1 a\iptables -I FORWARD -s 10.8.0.0/24 -j ACCEPT" $RCLOCAL
sed -i "1 a\iptables -I FORWARD -m state --state RELATED,ESTABLISHED -j ACCEPT" $RCLOCAL
fi
# If SELinux is enabled and a custom port was selected, we need this
if hash sestatus 2>/dev/null; then
if sestatus | grep "Current mode" | grep -qs "enforcing"; then
if [[ "$PORT" != '1194' ]]; then
# semanage isn't available in CentOS 6 by default
if ! hash semanage 2>/dev/null; then
yum install policycoreutils-python -y
fi
if [[ "$PROTOCOL" = '1' ]]; then
semanage port -a -t openvpn_port_t -p udp $PORT
fi
fi
fi
fi
# And finally, restart OpenVPN
if [[ "$OS" = 'centos' ]];  then
    #Workaround to avoid rewriting the entire script for Arch
sed -i 's|/etc/openvpn/server|/etc/openvpn|' /usr/lib/systemd/system/openvpn-server@.service
sed -i 's|%i.conf|server3.conf|' /usr/lib/systemd/system/openvpn-server@.service
systemctl daemon-reload
systemctl restart openvpn-server@openvpn.service
systemctl enable openvpn-server@openvpn.service
else
systemctl restart openvpn@server.service
systemctl enable openvpn@server.service
fi
# Try to detect a NATed connection and ask about it to potential LowEndSpirit/Scaleway users
EXTERNALIP=$(wget -qO- ipv4.icanhazip.com)
#echo $EXTERNALIP

# client-template.txt is created so we have a template to add further users later
echo "client" > /etc/openvpn/client-template.txt
if [[ "$PROTOCOL" = '1' ]]; then
echo "proto udp" >> /etc/openvpn/client-template.txt
fi
echo "remote $IP $PORT
dev tun
resolv-retry infinite
nobind
persist-key
persist-tun
remote-cert-tls server
auth $HMAC_AUTH
auth-nocache
$CIPHER
tls-client
tls-version-min 1.2
tls-cipher $CC_ENC" >> /etc/openvpn/client-template.txt

if [[ $COMPRESSION == "lzo"  ]]; then
echo "compress $COMPRESSION" >> /etc/openvpn/client-template.txt
fi

echo "setenv opt block-outside-dns
verb 3" >> /etc/openvpn/client-template.txt

echo ""
echo "Finished!"
echo ""
fi
exit 0;

To create users use:

createuser.sh

#!/bin/bash
#
# Generates the custom client.ovpn
homeDir="/root"
#echo $2 > /root/parola
cd /etc/openvpn/easy-rsa/
./easyrsa build-client-full $1 nopass
#</root/parola
cp /etc/openvpn/client-template.txt $homeDir/$1.v3.ovpn
echo "<ca>" >> $homeDir/$1.v3.ovpn
cat /etc/openvpn/easy-rsa/pki/ca.crt >> $homeDir/$1.v3.ovpn
echo "</ca>" >> $homeDir/$1.v3.ovpn
echo "<cert>" >> $homeDir/$1.v3.ovpn
cat /etc/openvpn/easy-rsa/pki/issued/$1.crt >> $homeDir/$1.v3.ovpn
echo "</cert>" >> $homeDir/$1.v3.ovpn
echo "<key>" >> $homeDir/$1.v3.ovpn
cat /etc/openvpn/easy-rsa/pki/private/$1.key >> $homeDir/$1.v3.ovpn
echo "</key>" >> $homeDir/$1.v3.ovpn
#We verify if we used tls-crypt or tls-auth during the installation
TLS_SIG=$(cat /etc/openvpn/TLS_SIG)
if [[ $TLS_SIG == "1" ]]; then
echo "key-direction 1" >> $homeDir/$1.v3.ovpn
echo "<tls-auth>" >> $homeDir/$1.v3.ovpn
cat /etc/openvpn/tls-auth.key >> $homeDir/$1.v3.ovpn
echo "</tls-auth>" >> $homeDir/$1.v3.ovpn
fi
echo ""
echo "Client $CLIENT added, certs available at $homeDir/$1.v3.ovpn"
exit

Put script in /root
And use it like EX: ./createuser.sh user

To revoke user do like this:
In console  give command

tail -n +2 /etc/openvpn/easy-rsa/pki/index.txt | grep "^V" | cut -d '=' -f 2 | nl -s ') '

to find out numbers of certificates,

results will looks like

1
2
3

use

tail -n +2 /etc/openvpn/easy-rsa/pki/index.txt | grep "^V" | cut -d '=' -f 2 | sed -n "2"p

to associate number 2 ( at the end of command bettwen "" - "2"p ) with the user which u want to revoke

U find out which one u need... and in console

cd /etc/openvpn/easy-rsa/
./easyrsa --batch revoke user
EASYRSA_CRL_DAYS=3650 ./easyrsa gen-crl
rm -rf pki/reqs/user.req
rm -rf pki/private/user.key
rm -rf pki/issued/user.crt
rm -rf /etc/openvpn/crl.pem
cp /etc/openvpn/easy-rsa/pki/crl.pem /etc/openvpn/crl.pem
chmod 644 /etc/openvpn/crl.pem

Thats it